Documenting one woman’s adventures into sweat equity projects.
My husband I purchased our Cape-style house in 2007 in “America’s Hometown” – Plymouth, MA. While not a total-fixer upper, it was a foreclosure and circa 1994. So it has needed some sweat equity to modernize it.
Also, I wouldn’t really classify myself as a “Diva”, as I neither look, act, nor dress like one. However, the name was catchy. No time for a Creative Brief for headline options. So, “Sweat Equity Diva” it is.
I'm very tired today and I didn't make much progress. I think 7 days of this is wearing on my and I didn't even plow through like I normally do.
After spending time cleaning Kaitlyn's room this a.m., I took her out to breakfast with my Mother-in-Law and I, so Hubby could spray the 2nd coat of primer.
So, Hubby got his part done. ;-) Here's what 2nd coat of primer looked like
Since it was so nice out, I took her for a quick walk down to the park to see if the ducks were out.
After, I dropped Kaitlyn off at my MIL's. She was going to watch her for the afternoon until early evening so I could bang through sanding all the doors and painting the 2nd coat of Brushing PUtty. Hubby had to work an event and had to leave at 3pm.
By the time I got back and did a few more things, it was 2pm before I started the sanding. And, it was nice out, but a little humid. Luckily it was a little shady by now on the back deck, so I set up there so as not to get a bunch of dust in the garage.
Let me tell you, sanding the doors is the worst! Especially if your doors have 3 layers of bevels - It's a bitch! That is why you have to be careful about the drip marks when applying. However, the bevels make it almost impossible to not have pooling of the paint in those corners. Especially since you have to put the stuff on thick.
The point is you have to sand it as smooth as possible so there are not bumps and there are just a lot more edges on the doors. I used a mixture of the palm sander, angled sanding sponges and sandpaper to get it smooth.
I only got through 6 doors and I still feel like I may not have done a good enough job. I don't know. I was out of time, and I was just frustrated with the sanding. This has been the worst part so far and I'm dreading sanding the rest of them, ughh.
I did have a few welcome interruptions - my neighbor stopped by to check my progress, I had to go to Home Depot to get more sanding blocks for those damn bevels, i needed a coffee, I talked to my friend on the phone. Ok, I think I was just not into it today. ;o)
The cabinet bases should be done by Monday or Tuesday, so at least we get take down all the plastic, clean up and use our kitchen again. There just won't be any doors or drawers on any of the cabinets for another week.
I feel like I'm on that show "Renovations Realities" on DIY network where these people always take 3 days off or a week to redo their whole kitchen. And, i always think how stupid they are thinking they will get it done in that time and they always run into problems. I guess I'm living the "reality" of it!
Friday, June 17th, 2011
I'm not sure how much I'm going to recap tonight, as I'm really tired. I didn't do that much more than normal today, but maybe it's finally catching up to me.
This a.m. I went to the paint store to buy some more Brushing Putty and the FPE Mineral Spirits to thin the primer for the HVLP sprayer. I bought the EuroGallon of the BP, but I think I should have just bought 2 more quarts, in case I don't use the other one. Oh well. If one of my local friends decides to embark on this adventure and use the FPE line, I'll give it to them. We'll see.
Hubby and I cleaned out one side of the garage so I could paint the cabinet doors and drawer fronts down there.. It will also become a spray booth to spray the doors and drawer fronts after.
Then we prepped the kitchen some more so he could start spraying 1st coat of primer. PREP VIDEO HERE
We decided to NOT spray the inside of the cabinets as it would take more paint. (although, since we are spraying, we are discovering we may have a LOT of primer and paint left over, as you don't use as much)
So he built his cardboard contraption things to hold inside the cabinets as he sprays vs. masking them off. Genius! (although professional painters probably have something like this. I think that is what he said?)
He set up his HVLP sprayer. NOTE, his HVLP sprayer is a actually a detail automotive HVLP sprayer made for the automotive industry. Not your typical HVLP sprayer. (I think that is what Hubby said?). He used it to spray his boat or something, he's not in the automotive industry. Just really handy.
Oh and b/c he is using this sprayer, it needs to attach to a compressor, which he has.
Same thing you hook a nail gun to. He has everything, luckily. So, that was in the garage while I'm getting ready to paint, and it's LOUD.
I think if you rent one from Home Depot its' a turbine sprayer or something. I don't know, I'm just glad he's spraying and i don't have to brush on 3 more coats of everything!
Also, because you are spraying an oil primer, you need to thin it with Mineral Spirits. FPE strongly recommends using their Mineral Spirits. Of course, more $$ for them. It was only $24 for the Eurogallon at least.
And luckily hubby is smart as when he was measuring out how much mineral spirits to add, he had to convert from metric I believe. I don't know, not my area to figure out the sprayer.
So yes, this has become 50% his project as well and maybe I need change the title of this blog ;o)
Then, he sprayed and I video taped for about 1 mintue (below) and then had to get out of there because of the fumes. The sprayer is almost like an airbrush sprayer and does a light coat. So, he will do another coat of primer. It took him about 45 min. or less once he started. Oh, and he probably should have put his respirator mask on, but he forgot. next time.
The texture is that as if you, well, sprayed lightly! Definitely not orange peel, but it looks sprayed and not smooth. I wanted that though. Hopefully you can see the texture from these pictures.
This 3rd pic BEKOW was over the super-smooth "like glass" area/panel that the grain filler really filled.
It didn't really cover up any existing grain marks, yet. I don't know if that is a product of spraying and it being a light coat and if you brush on everything, if it might help fill in more? I don't know. After every coat we'll see. At this point I don't care anymore as you can only see it up close in certain angles if you are REALLY looking. I only care that I spent so much $$ on this stuff when I still could have gotten good stuff, but for less (Benjamin Moore or Cabinet Coat). We'll see when it's all done. I hope I didn't fall into some Marketing ploy when I'm in the business ;o)
At the end of the day I think it will look great! However, I think no matter what you do with oak cabinets, you will minimally see the grain.
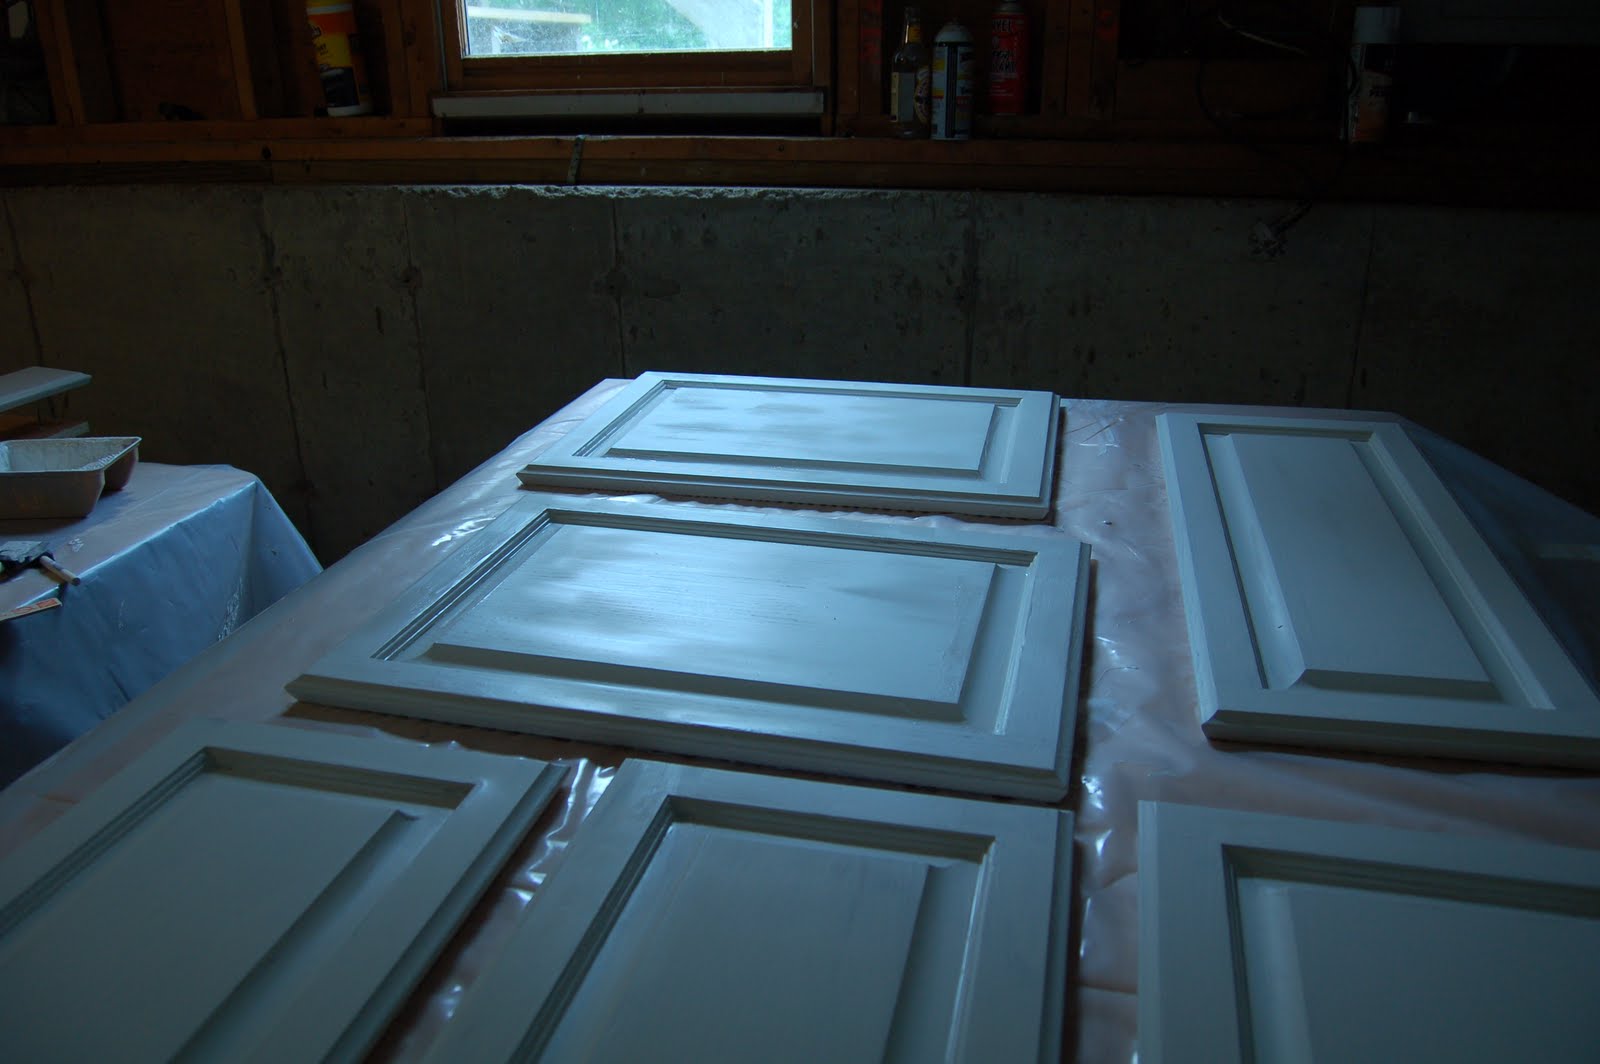
I went in the garage and put the 1st coat of BP on all the doors/drawers. Only the fronts and edges. The backs you don't really care if you see the grain, so they will only be primed and painted.
I had Hubby put together a peg board with nails to paint each cabinet on so could get the edges and wipe the drips. I then carefully took it off from underneath and put it on the plastic. they will stick a little, but much less. And, remember there is sanding involved, so no need to stress that much, as you can sand it away. If you are going to brush on the primer and paint, you might want one huge pegboard. I don't know. I'm just glad I'm not brushing all these coats!!!
Just make sure you have everything set up and ready to go, as like I said, this stuff gets tacky quicker than regular paint. So, you just have to plug through it, yet put in on thick and watch for drips.
I used the rest of the 2nd Euroquart first - I had about 3/4 left. That got me through 6 doors and 2 drawer fronts. It took about 1.5hrs.
I took a quick lunch break then started up to finish the rest and they took me almost 3hrs. I did 16 door fronts and 6 drawer fronts today. I had already done the 1st coat on those other 2 drawer fronts and 2 door fronts.
I only used about 1/4 of the Eurogallon, which makes me think I should have just gotten 2 more quarts and just brought back 1 quart if I didn't need...grrr. oh well.
This how thick I applied it and what it looks like with 1st coat just painted.
And slightly dry:
Also, at first I tested 3 options for application. A 1.5" 'Better' brush, a 1" 'BEST' brush, and then the foam brush.
The 1" and 1.5" worked best both because of size and the quality. So, I used those 2 for the rest.
I know they say to use throw away brushes, but using better brushes give you better results. Your choice whether to throw them away after each coat of BP, just rinse them with Mineral Spririts. I ended up rinsing them down with the mineral spirits when I took that 1st break, versus throwing them away before I started the rest of them. This was my 1st time working with oil paints, and it isn't that bad. The fumes are worse and it is a pain that you can't just wash away with water, but it's not horrible. Just be careful when you touch stuff as remember, you can't just wipe it away with water like latex!
Oh, and I forgot to take my wedding rings off today, but I've taken them off every other day! Ughh...So, I quickly scrubbed them in the mineral spirits so the paint wouldn't set. Remember this is not latex paint!
It's hard to believe I'm already on Day 6 on this project, and that my 'vacation' week is almost over. And, I (or I should say 'we' now), have plenty to do.
I'm slower than most as I'm a perfectionist and need to be organized. Also, having an 18-month old has slowed the project down to be a 9-5 job for the most part. I could probably be a little further ahead if I just had to wake up in the a.m. and start, and stop until whatever hour at night. Her room is right above the kitchen though.
Anyway, today was a good day. I didn't get through as much as I wanted, but as I've said, things always take longer than you plan.
Oh, 2 things.
1. My friend Anne asked, "what do you do about eating while this is going on?".
Well, the answer is, you mostly eat out, grill or make cereal or something. When I cleared out the cabinets, I was pretty organized and placed a bunch of items we would REALLY need on the hutch for easy access. However, once I had the stove and microwave all covered with the masking paper, it's harder to cook. However, Hubby likes to eat non-stop (aka the 'Snack King'), so he already broke a few holes in it to get at the microwave and the oven. The fridge I just had a drop cloth over. We aren't at the spraying stage, so things are still a little easy and we can just cover it back up. Once he starts spraying, I don't think we'll want to cover and uncover things if it's masking paper. I suppose you can just use more drop cloths instead? Or, some people actually move their appliances out to another area. you actually SHOULD move your fridge and possibly your stove and microwave I think. The only reason we didn't, is after Hubby did the hardwood floors , when they put all the appliances back in, no matter how careful they were, some scratches happened. So, we figured we would just leave them in place and risk more scratches when they come out some day to replace with Stainless appliances. If needed, I can paint any parts that are necessary at that time.
2. I'm tired, and I already forgot what #2 would be! Oh wait, last night I forgot to mention I forgot to do a 2nd coat of the BP on the panel to the left of the sink. I decided to try a small foam roller (a cheaper one) to see how that came out. This a.m. it looked like a slight orange peel texture, as you would expect from a foam roller. I tried to take a picture, but for whatever reason my nice hi-res camera wasn't cooperating and you can't see the detail.
Later it sanded out fine. So, we'll see, maybe I'll try rolling on the drawer and door fronts. I just don't know if you can get as thick as needed for a 1st coat, so might just be good for a 2nd coat.
I went to Home Depot this a.m. to return those horrible brushes. I bought the "Better" ones, along with a nice foam roller to try that out. I also grabbed a LOT more sanding blocks and just broke down and bought a huge 20pk of the 220 grit sanding paper. The blocks are convenient, but the are about $3/pop. You'll be sanding between every coat, so you'll need a lot of the 220. So, just bite the bullet and get mostly sheets, and then some angled sanding blocks for the grooves, edges and corners that are hard to get into.
I spent the morning and early afternoon sanding the 2nd coat on all the cabinet faces/bases, as I thought Hubby would want to start spraying the primer in the afternoon. It's a LOT of sanding. Not horrible, but, you can't just quickly go over it. YOu need to make sure it's smooth. It's almost like when you patch a hole in drywall with the plaster. You need to sand it down. It's a little lighter in consistency than that, but that's what i felt like.
It took me about 1.5 hours to do all the top cabinets, and about 45 minutes for the bottom.
Oh, and I'm feeling better about the BRushing Putty as everything was pretty smooth and about 95% filled in. I'm just hoping 2 coats of primer and 2 coats of paint will really fill it in.
Then, I was going to vacuum everything up and start the 1st coat of Brushing Putty on all the door and drawer fronts.
WEll, I forgot Hubby had still had to put on the crown molding before he sprays the primer, so I didn't want to vacuum until he was done making a mess with that. I needed to vacuum to get most of the dust out from the room before I started the 1st coat of BP on the door/drawer fronts.
While he did that, I vacuumed and wiped down all the door and drawer fronts outside. (I had only scuff sanded them yesterday). I used our regular vacuum (an older one) with the brush attachment.
Then, I wet a lint-free rag and had a dry lint-free rag and wiped down the doors that way vs. the tack cloth. Hubby said that painters do it that way and he had nver heard of the tack cloth! The tack cloth is what 'This Old House' , 'DIY network' and other sites had said to use. They work great, but the are "tacky" and the rags were easier.
Then I cleaned and prepared the kitchen table inside by placing down new plastic, to place all the clean, dust free doors on to start painting the 1st coat of BP. Hubby was still finishing up the molding, so I covered them with a clean sheet of plastic.
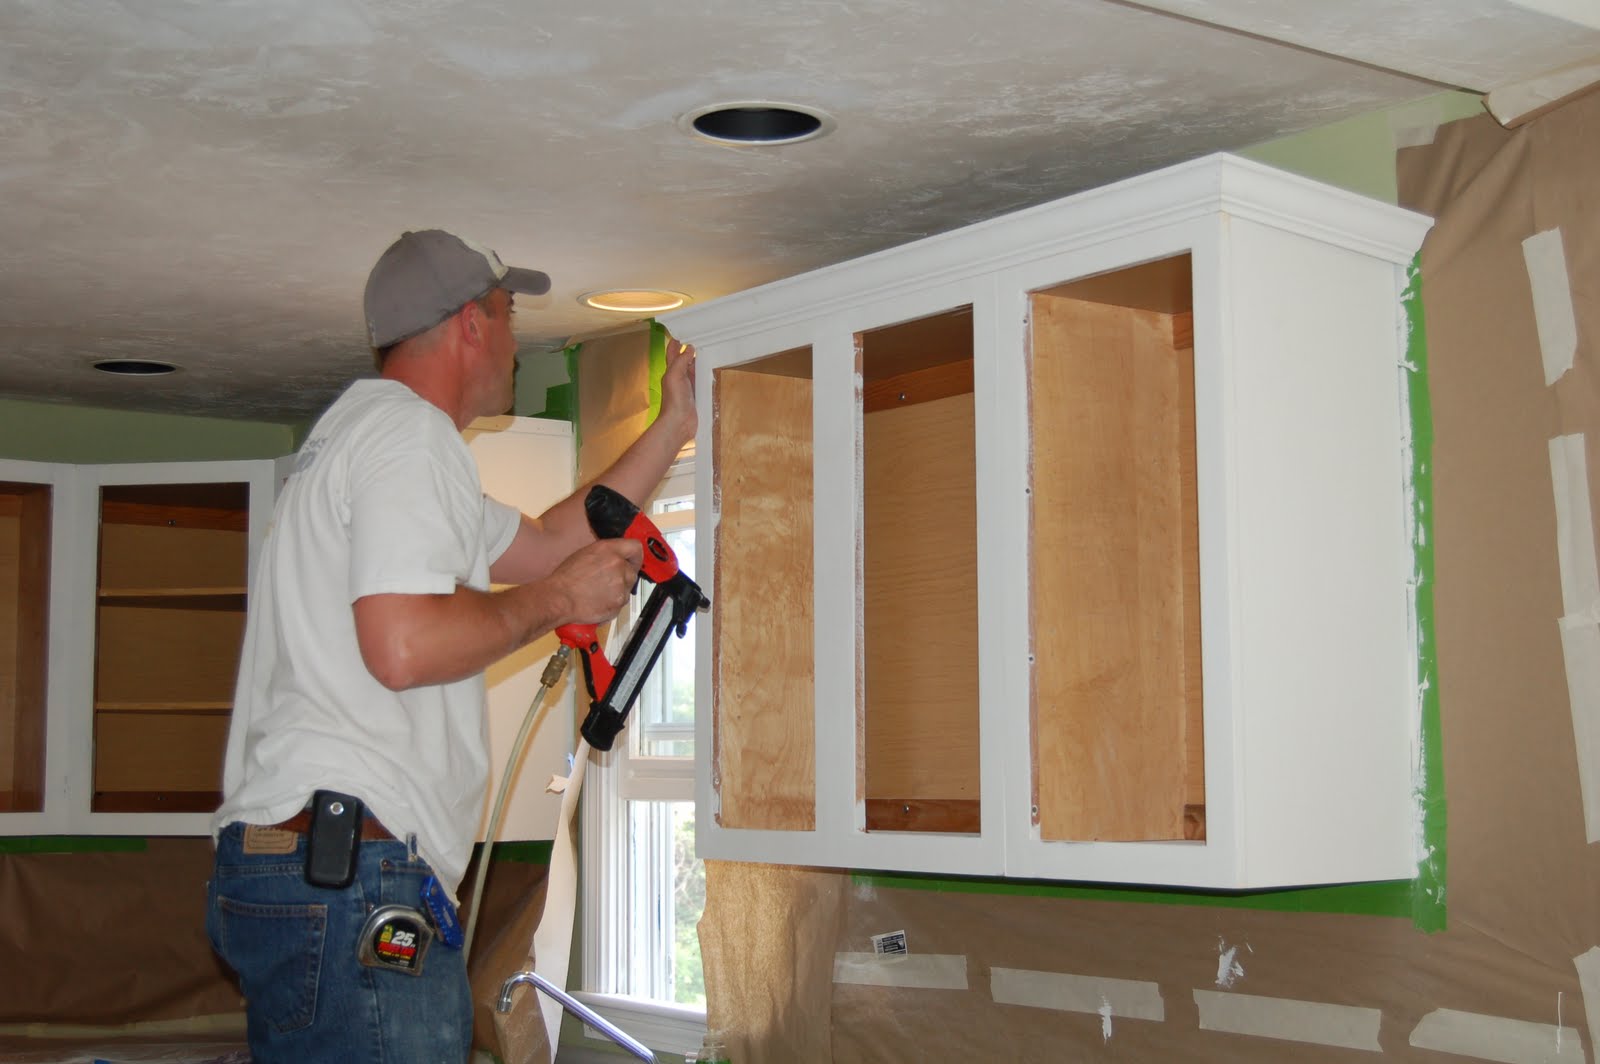
He finally finished and it looks SO good! It's amazing what adding less than $100 of trim does to make it look nice!
AT this point we had to go pick up Kaitlyn and we decided to just eat out for dinner vs. grilling.
So, I just vacuumed up all the sanding dust inside the cabinets, on the counters, floors, etc. to prepare for him to spray the primer on tomorrow.
REmember, it all has to be as dust-free as possible before the next coat. I'll still have to wipe down all the cabinet faces with the wet rags.
My plan after dinner was to start the drawer fronts/doors, but then I realized I'm tired. I'll also have to get more Brushing Putty as i finished 1 EuroQuart and only have 3/4 of the other EuroQuart.
This is about the time in the project when it's not fun anymore and you just want it to be done. Although I have to say, I haven't felt stressed or rushed since I have basically 9 days and no big party to throw afterwards.
Surprisingly, I've been enjoying it!
Until today. Today I encountered frustrations, mishaps and disagreements.
Late start today as I think I had a headache from the fumes. After dropping off K and my usual DD run, I stopped at Home Depot to pick up some more sanding blocks and some more cheap, throwaway brushes. I decided to try the foam brushes as well for the 2nd coat to see if that would help with the brush strokes.
I had to do a little work and then I finally started around 10am or so. However, I got distracted by the 2 fighter jets flying around in circles above the house. Not sure what that was about? Of course I took video. Maybe they were after that small plane? maybe it was just a test flight? i don't know. I'm sure we'll never know.
Finally, I first inspected everything to see how the Brushing Putty did and then started sanding the 2 test doors and 2 test drawer.
HERE are 3 VIDEOS, hopefully you can see?
As you heard, I have mixed emotions about the FPE Brushing Putty. In some areas it's "Wow" and "smooth as glass". Then, in some areas you can still see grain or brush strokes. Now, the FPE guy did say I would probably need 2 coats. However, for as expensive as this stuff is, I thought it would be the miracle solution to fill the grains. In my experience, it DOES work better than just primer and paint (of the ones I used).
However, it's REALLY thick (hence the name putty) so its more difficult to work with than regular paint.
(BTW, if you are new to this and didn't know, you CLICK ON any of the PICS in the blog, you can view them bigger)
I guess it's all about quickness before it gets tacky, putting it on thick and brush stroke. SEE PIC ABOVE.
For a DIYer, that is hard. Although, this isn't my first time painting.
However, so far it's coming out MUCH better than my bathroom cabinet experiment where I believe I did TSP, sanded, 1 coat of primer and 2 coats of paint (I think?) At least better for a first coat than the primer and 2 coats of paint.
HERE is a video and some pictures of my downstairs bathroom test cabinet that i mentioned in the videos and above. I did this in December before Kaitlyn's 1st Bday. The videos and pictures make it look shiner, but it doesn't look that way. And, you don't really notice the grain unless you REALLY look, or are just anal like me. I don't know, it just bothers me. It's fine for this cabinet as we are eventually going to toss it, so I just used it as a test and to freshen up the look of the downstairs bathroom the best I could.
Hence, it's why I researched online and came across the Fine Paints of Europe Brushing Putty. I thought it would be the ultimate solve! And, it is, sort of. I guess I just have to see after a 2nd coat of the Putty, 1 coat of Primer and 2-3 coats of paint.
For a 1st coat, I guess it DOES cover very good, knowing at least 3-4 other coats will be on top of it.
I'm being anal and a perfectionist, I know. I drive my own self crazy. ;o)
I guess I just need to relax and realize that the fact is:
I AM painting cabinets and they aren't brand new professionally painted cabinets.
b/c they are Oak (which is the worst cabinet to paint b/c they are so grainy and porous) I may never completely get rid of the grain.
I'm doing a better job then most people, so they won't look shitty and hopefully our realtor will like them as when I mentioned that we may paint our cabinets, he sort of cringed. He just said "I've just seen a lot of bad paint jobs". (we aren't selling our house, we just had our realtor come by 6-8 months ago to give us his opinion on what our house may be worth since we want to refinance)
They will look fine, and no one else will give a rats ass about it but me and any professional cabinet painter that happens to come to my house. ;o)
ANYWHO....
I went on to sand all the faces. The 220 grit angled sanding blocks worked well. I even used the 150 sometimes if there were drip spots were bumps may show.
Then I marked the areas with blue painters tape where a 2nd coat would be good.
Then, after Hubby told me I didn't need a 2nd coat on the ends, I went ahead and did it anyway. ;o)
All was fine with the 2nd coat and then something BAD happened.
This is what it looked like before I put on the 2nd coat.
Then, after the 2nd coat....well, there are no pictures, as that is where I got frustrated and walked outside for some air. I then decided to get hubby involved and tell hubby "ok, I know you said not to touch this panel, but I did anyway (of course), but I don't know why it's doing this? You were right."
Then it turned UGLY and into arguing.
It was doing this bubbling/globbing thing, but ONLY on this 1 cabinet. (much later it did it minimally on a few other areas, but not as bad. This is what it looked like, but it was probably over 1/2 of this panel.)
At 1st I thought it was just brush strokes at 1st, so I added more BP, and then it kept doing it. So I thought, maybe it's dust or just when the paint sits too long it tends to glob. Then, "Maybe it's this crappy brush and the parts of the brush are coming off". I don't know, I had to walk away.
I decided to tell Hubby and he came to look at it and said I put too much on (the can specifically says to put it on thick) or that maybe it was wet underneath (it dried for the 16 hours and I was able to sand it and it wasn't wet or tacky). So, the argument ensued.
I just kept thinking maybe that panel in particular had something wrong with it that made it react funny, since at that time, NONE of the other panels did it. and, it was the only panel that I had used the brush on. I went back to the foam brush after it started doing that.
Anyway, finally, he said it would have to be scraped off. So, he did that. If you touch it, it was actually still smooth. so, we're just going to leave this one, and see how it turns out with just primer and paint.
I continued with my 2nd coat touch up and decided I would return these really cheap brushes to Home Depot, in case that was part of the problem.
I didn't use these on 1st coat, I used these. So I'll probably just get more of this level/brand.
Then, Hubby went out to look for the crown molding to go on top of the cabinets, as we might as well spray those with the sprayer while we're at it. NO Brushing Putty for those!
Peace and quiet.
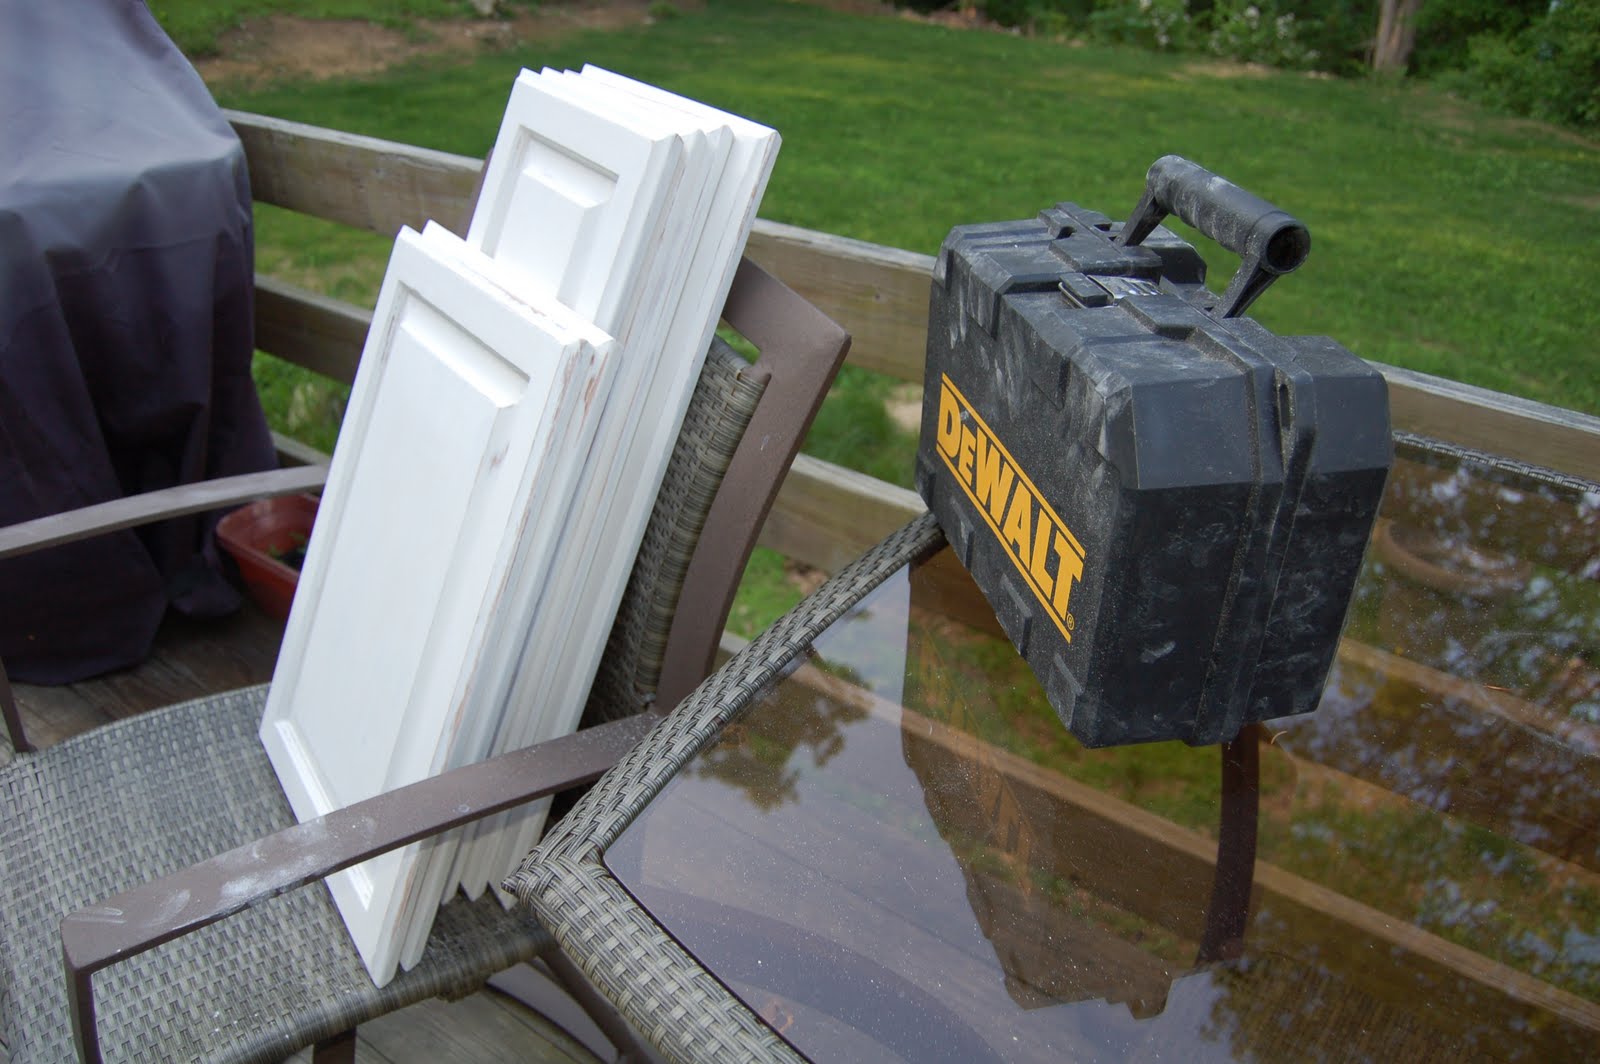
It was a sunny, 70 degree and dry, CA-like day and it was shady, so I went on the back porch to scuff - sand all the doors and drawer fronts. I was speeding along and focused and blew through 14 doors/drawer fronts in 1 hour. I had about 7 more left Hubby and K came home and it took me an hour to do the rest of those. sidetracked.
I used the palm sander for the flat parts of fronts and backs. Then touched up with angled sand blocks. (GET THE ANGLED SAND BLOCKS) You need to use the sand blocks if you have grooves in your doors. A PIA, but you just need to get into a rhythm, with the grooves and all. BOTH sides of doors need to be scuff -sanded. Backs will only get primer and paint, not BP.
Also, I when you sand into the grooves, more grime may come that the TSP didn't get out and get stuck in corners. Use a screwdriver, push pin, whatever, to help get more out. Then brush away with toothbrush. Remember, NO dust or grime.
Instead of vacumming, I just lightly dropped each panel face down on the deck to tap the dust out. Worked great! Then, I just need to use the tack cloth/damp lint-free rag to get the rest off. Hanging the door off the edge of table to sand the edges worked well with the angled brush, and then you just spin to each side. Again, a rhythm of what works.
Tomorrow I'll sand 2nd coat of all the cabinet faces. Then Hubby will get the sprayer out and spray on the primer. While he's doing that, I'll wipe all the dust off all the doors I sanded, and then apply 1st coat of BP to those! Yippee.
We figured if we can get the cabinet boxes done first, we can start to get our kitchen in some sort of order in the next few days. The doors I can just do in a spray booth in the garage or on tables (for the BP party).
And, look, about 6 weeks in, our grass is green and growing. Some bare spots still, and weeds popping up. But, we need to wait a few more weeks before we can add more weed killer. (oh, Hubby decided he needed to mow the lawn when he came home, so I had to shut all the windows to not get more dust in...thus suffering in the fumes for 1/2 hour.)


